Self-hosting SimpleLogin gives you bidirectional email aliases (receive, reply, and send as the alias) for about $3/month on a small VPS, using Docker, Postfix, and Brevo as the SMTP relay. The one trap that eats an afternoon: Postfix won't trust Brevo's TLS cert until you point it at the system CA file. Everything else is just DNS and containers.
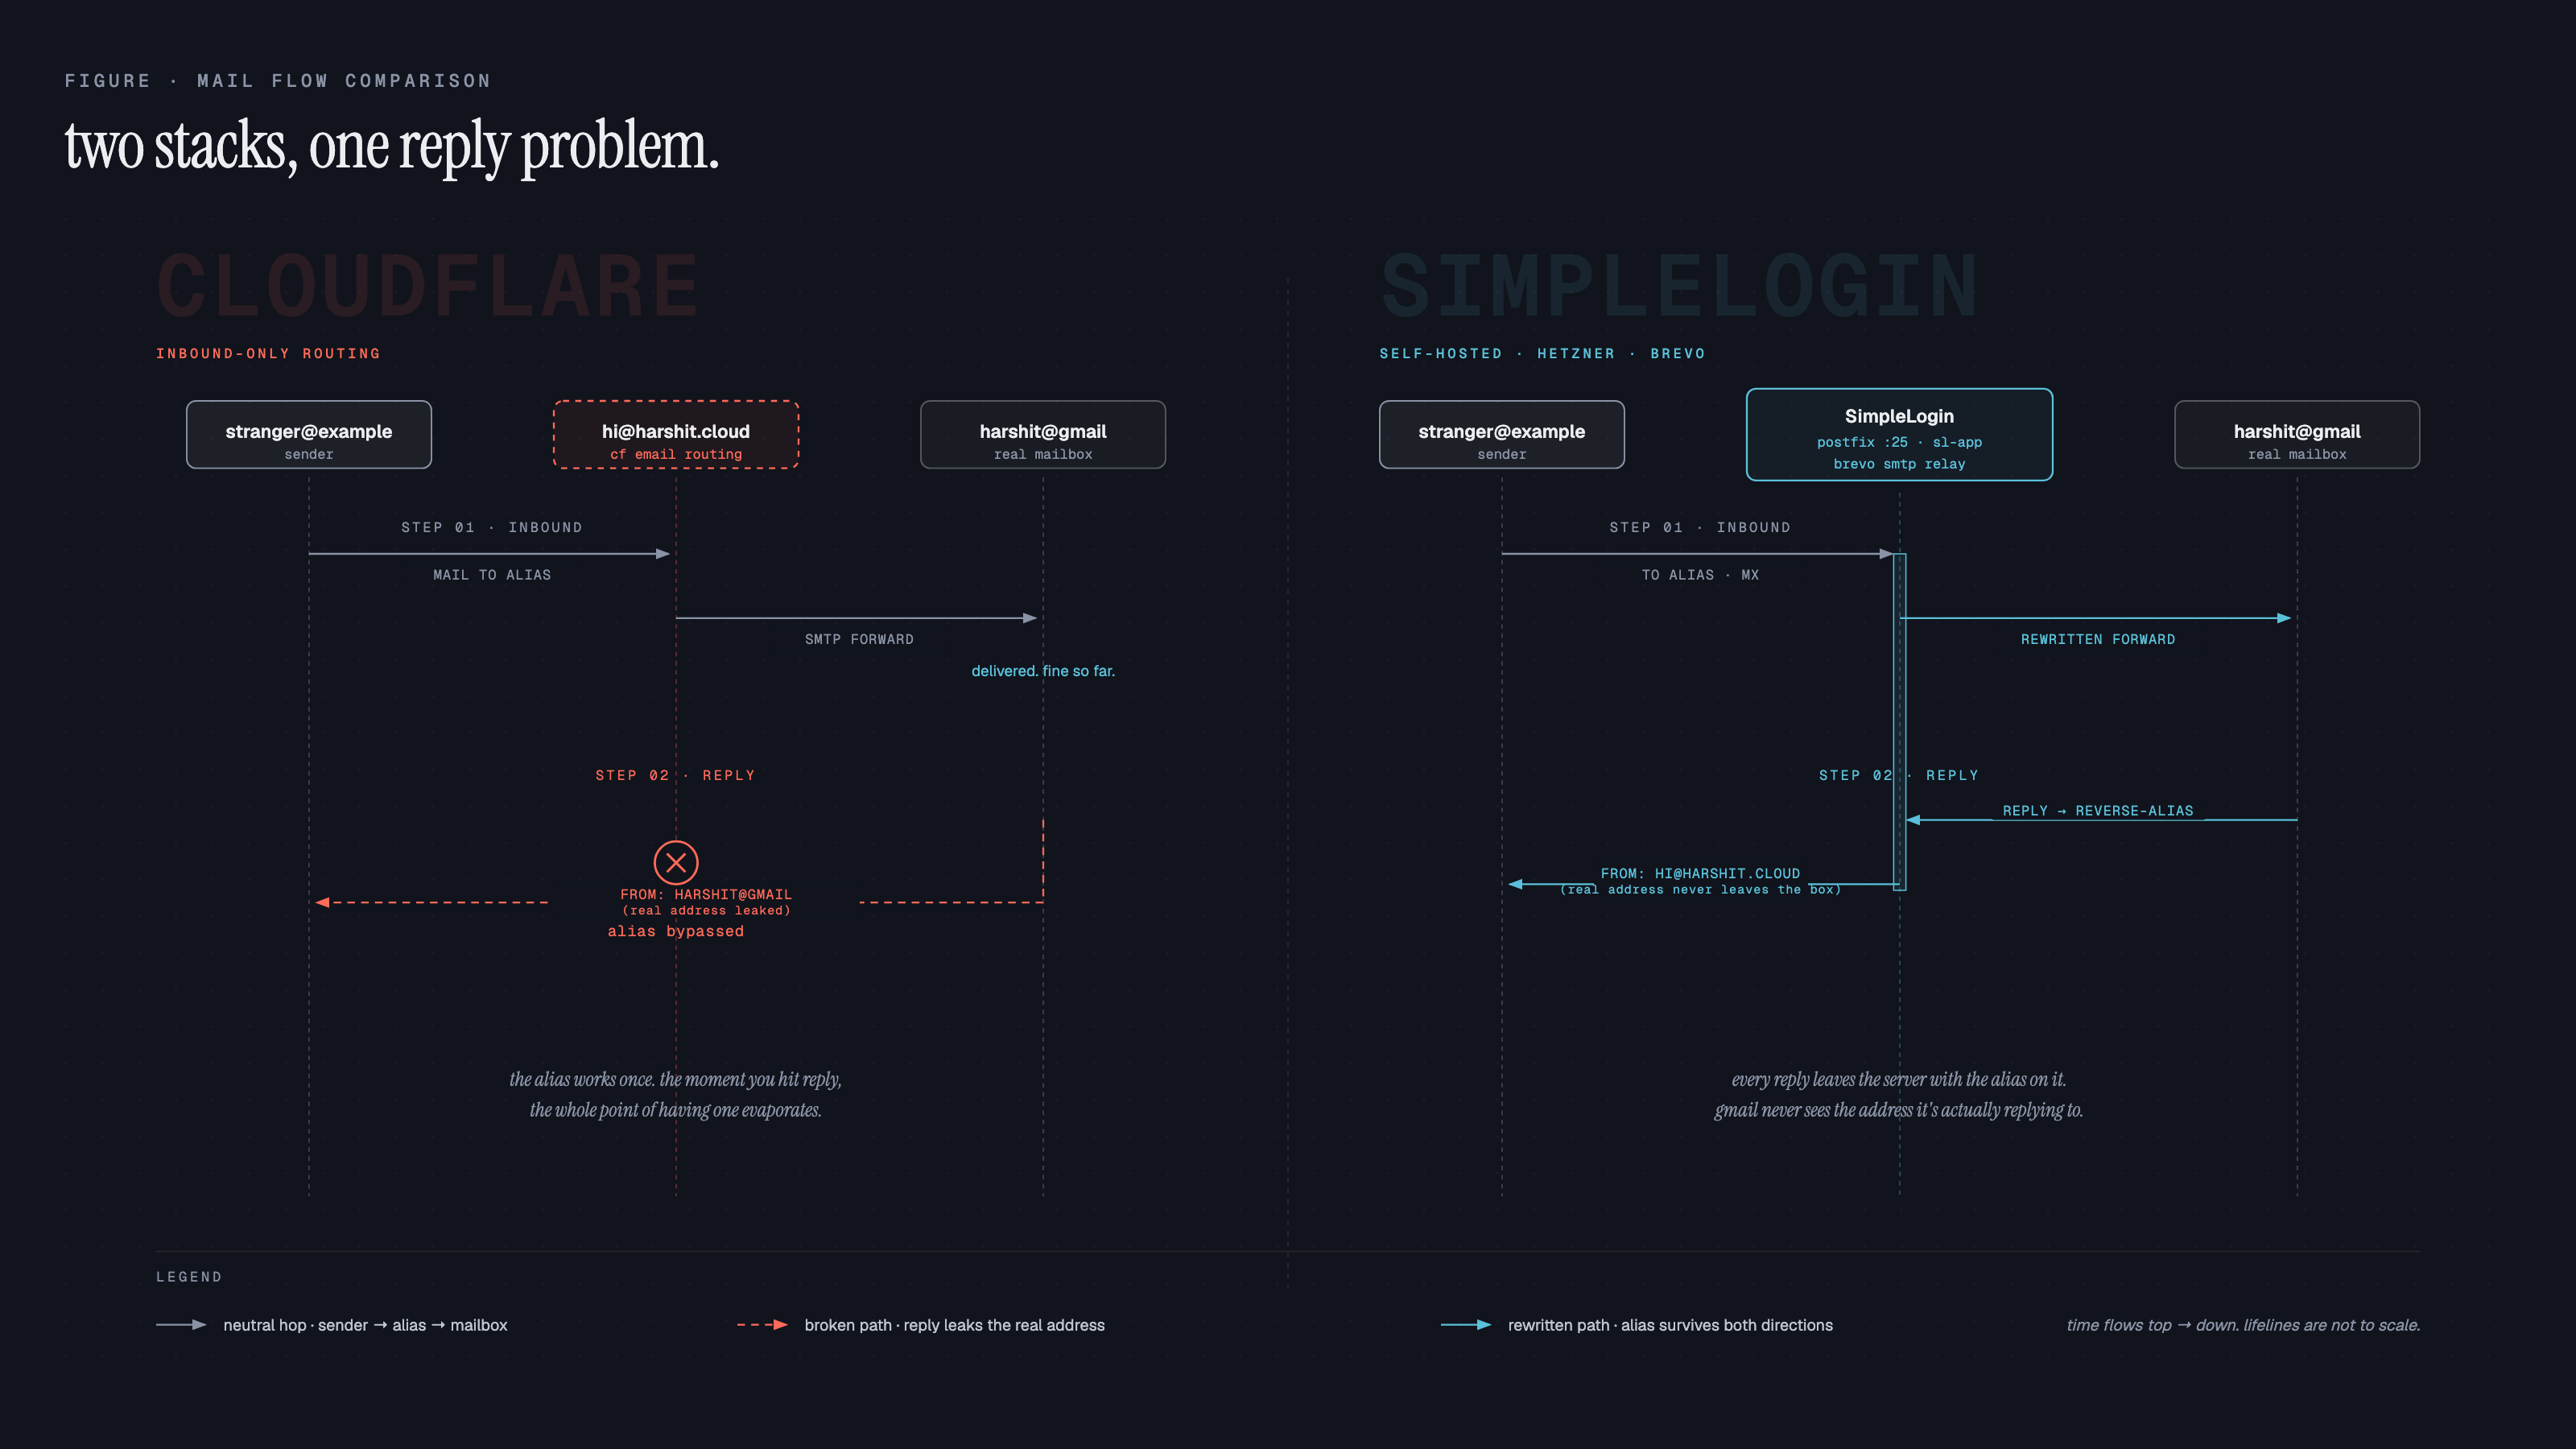
I'd been running Cloudflare Email Routing for months. Free. Dead simple. Emails hit my custom domain, forwarded to Gmail. Privacy-friendly aliases without paying a dime.
Then I tried to reply from an alias. Couldn't.
Cloudflare Email Routing is inbound-only. You receive emails at your alias, but when you hit reply, it goes out from your real Gmail address. The whole point of aliasing — gone in one click.
I'd already moved my infrastructure to a self-hosted Dokploy setup running on Hetzner. The server was sitting there at 8% CPU. Why not run my own email aliasing too?
Two hours later, I had full bidirectional email aliases running on SimpleLogin. Here's every step, including the TLS trap that almost made me quit.
why Cloudflare email routing wasn't enough
Credit where it's due. Cloudflare Email Routing is genuinely great for what it does:
- Free. No credit limits, no tier anxiety
- 5-minute setup. Add MX records, create routes, done
- Reliable inbound forwarding. Never lost an email
But the moment you need to reply from an alias or send a new email as your alias, you're stuck. Cloudflare loosened Email Workers' reply restrictions in March 2025 to let you programmatically process and reply to emails. But it's a developer tool for automated responses, not a "hit reply in Gmail" solution.
| Feature | Cloudflare Email Routing | SimpleLogin (Self-Hosted) |
|---|---|---|
| Cost | Free | ~$3/month (VPS) |
| Setup time | 5 minutes | ~2 hours |
| Receive to alias | Yes | Yes |
| Reply from alias | No | Yes |
| Send as alias | No | Yes |
| Custom domains | Yes (CF nameservers required) | Yes (any registrar) |
| Open source | No | Yes |
| PGP encryption | No | Yes |
| Self-hosted option | No | Yes |
If all you need is inbound forwarding, stick with Cloudflare. It's free and it works. But if you want actual email aliases, where you can reply and send and nobody ever sees your real address, you need SimpleLogin.
what you'll need
Before diving in:
- A VPS with ports 25, 465, and 443 open (Hetzner, Contabo, etc. — ~$3/month)
- A domain with DNS you control
- A Brevo account (free tier: 300 emails/day) for outbound SMTP relay
- 30 minutes of focus for DNS, plus another hour for the stack
Key Insight: Most residential ISPs and some cloud providers block port 25. Hetzner doesn't by default, but you might need to request it. Check before you start — no port 25, no self-hosted email.
architecture overview
Here's how the pieces fit together:
Inbound Email Flow:
Internet → MX Record → Your Server:25 (Postfix) → SimpleLogin App → Your Mailbox

Outbound Email Flow:
SimpleLogin App → Postfix → Brevo SMTP Relay → Recipient
Four containers plus Postfix on the host:
| Container | Role | Port |
|---|---|---|
sl-db | PostgreSQL database | 5432 |
sl-app | Web UI + API | 7777 |
sl-email | Email handler (SMTP) | 20381 |
sl-job-runner | Background tasks | — |
Plus Postfix running directly on the host, listening on port 25.
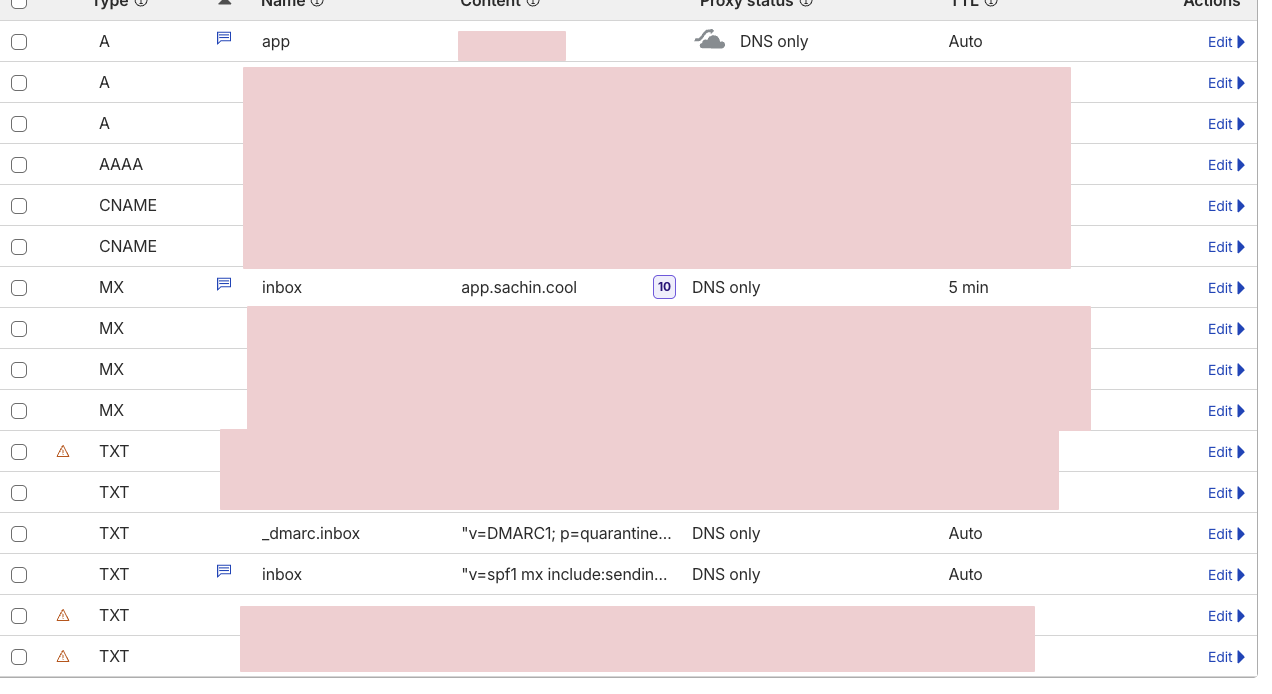
the DNS gauntlet
DNS is where most people give up. Don't. It's just a lot of records. Set them all up at once and verify later.
For a domain like sl.example.com with server IP 203.0.113.50:
A Record
Type: A
Name: sl
Value: 203.0.113.50
Proxy: OFF (DNS only)
MX Record
Type: MX
Name: sl.example.com
Value: sl.example.com
Priority: 10
SPF Record
Type: TXT
Name: sl.example.com
Value: v=spf1 mx a ip4:203.0.113.50 include:spf.sendinblue.com ~all
The include:spf.sendinblue.com is critical — Brevo (formerly Sendinblue) sends your outbound mail through that SPF record.
DKIM Record
Type: TXT
Name: dkim._domainkey.sl.example.com
Value: v=DKIM1; k=rsa; p=YOUR_DKIM_PUBLIC_KEY
You'll generate this key during Docker setup. Come back and add it then.
DMARC Record
Type: TXT
Name: _dmarc.sl.example.com
Value: v=DMARC1; p=quarantine; pct=100; adkim=s; aspf=s
PTR Record (Reverse DNS)
Set this in your hosting provider's panel, not your DNS. It maps your IP back to your domain. Most providers have a "Reverse DNS" or "rDNS" field in the server settings.
203.0.113.50 → sl.example.comKey Insight: If you're using Cloudflare DNS, the A record for your mail subdomain **must** be set to "DNS only" (grey cloud). Cloudflare's proxy doesn't pass through SMTP traffic on port 25. Orange cloud = your MX record points to Cloudflare's proxy = mail delivery fails silently.
Verify Everything
Don't move on until these pass:
# MX record
dig MX sl.example.com +short
# Should return: 10 sl.example.com.

# SPF record
dig TXT sl.example.com +short
# Should include: v=spf1 mx a ip4:203.0.113.50 include:spf.sendinblue.com ~all

# A record
dig A sl.example.com +short
# Should return: 203.0.113.50

# PTR record
dig -x 203.0.113.50 +short
# Should return: sl.example.com.
why Brevo? IP reputation is everything
Why not send directly from Postfix? You can. Gmail, Outlook, and Yahoo will just spam-folder it — or reject it outright.
Email deliverability depends on IP reputation. A fresh VPS IP has none. To the big providers, that looks identical to a spammer on a throwaway server. Building reputation takes weeks of careful warm-up. For a personal alias service sending 10 emails a day, it's not worth it.
Brevo's SMTP relay solves this. Your Postfix hands mail to Brevo, and Brevo sends it from IPs with years of established reputation. Your email lands in inboxes, not spam. Free tier: 300 emails/day.
setting up Brevo
Sign up at brevo.com. Then:
- Go to Settings > SMTP & API
- Generate an SMTP key
- Note your SMTP login (it's your account email, not a generated username)
- Add and verify your domain under Settings > Senders & Domains
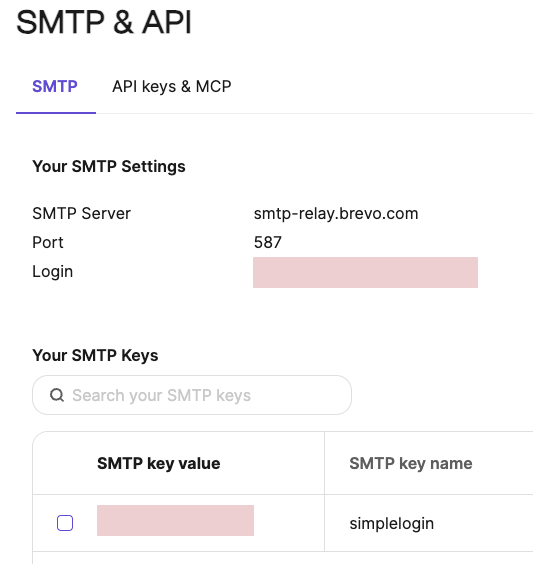
Save the SMTP key. You'll need it for both the SimpleLogin env file and Postfix config.
docker setup
SSH into your server. Let's build this.
Create the Network and Directories
docker network create sl-network

mkdir -p /sl/pgp
mkdir -p /sl/db
mkdir -p /sl/upload
Environment File
Create /sl/simplelogin.env:
# Domain
URL=https://sl.example.com
EMAIL_DOMAIN=sl.example.com
SUPPORT_EMAIL=support@sl.example.com
ADMIN_EMAIL=admin@sl.example.com

# Email
EMAIL_SERVERS_WITH_PRIORITY=[(10, "sl.example.com.")]
DKIM_PRIVATE_KEY_PATH=/dkim.key
DKIM_PUBLIC_KEY_PATH=/dkim.pub.key

# Brevo SMTP Relay
POSTFIX_SERVER=host.docker.internal
POSTFIX_PORT=25

# Database
DB_URI=postgresql://sl_user:your_strong_password_here@sl-db:5432/simplelogin

# Flask
FLASK_SECRET=generate_a_long_random_string_here

# Features
DISABLE_ALIAS_SUFFIX=1
NOT_SEND_LINK_TO_SELF=1
ENABLE_SPAM_ASSASSIN=0

# PGP
GNUPGHOME=/sl/pgp
Generate your secrets:
# Flask secret
openssl rand -hex 32

# Database password
openssl rand -hex 16
Generate DKIM Keys
openssl genrsa -out /sl/dkim.key 1024
openssl rsa -in /sl/dkim.key -pubout -out /sl/dkim.pub.key

# Get the public key for your DNS record
cat /sl/dkim.pub.key | sed '1d;$d' | tr -d '\n'
Copy that output. Go back to your DNS and paste it as the p= value in your DKIM TXT record.
Start PostgreSQL
docker run -d \
  --name sl-db \
  --network sl-network \
  --restart always \
  -e POSTGRES_DB=simplelogin \
  -e POSTGRES_USER=sl_user \
  -e POSTGRES_PASSWORD=your_strong_password_here \
  -v /sl/db:/var/lib/postgresql/data \
  postgres:16
Initialize the Database
docker run --rm \
  --name sl-migration \
  --network sl-network \
  --env-file /sl/simplelogin.env \
  -v /sl/dkim.key:/dkim.key:ro \
  -v /sl/dkim.pub.key:/dkim.pub.key:ro \
  simplelogin/app:4.6.5-beta \
  alembic upgrade head

docker run --rm \
  --name sl-init \
  --network sl-network \
  --env-file /sl/simplelogin.env \
  -v /sl/dkim.key:/dkim.key:ro \
  -v /sl/dkim.pub.key:/dkim.pub.key:ro \
  simplelogin/app:4.6.5-beta \
  python init_app.py
Start the Application Containers
# Web app
docker run -d \
  --name sl-app \
  --network sl-network \
  --restart always \
  --env-file /sl/simplelogin.env \
  --add-host=host.docker.internal:host-gateway \
  -v /sl/dkim.key:/dkim.key:ro \
  -v /sl/dkim.pub.key:/dkim.pub.key:ro \
  -v /sl/upload:/code/static/upload \
  -p 127.0.0.1:7777:7777 \
  simplelogin/app:4.6.5-beta

# Email handler
docker run -d \
  --name sl-email \
  --network sl-network \
  --restart always \
  --env-file /sl/simplelogin.env \
  --add-host=host.docker.internal:host-gateway \
  -v /sl/dkim.key:/dkim.key:ro \
  -v /sl/dkim.pub.key:/dkim.pub.key:ro \
  -v /sl/upload:/code/static/upload \
  -p 127.0.0.1:20381:20381 \
  simplelogin/app:4.6.5-beta \
  python email_handler.py

# Job runner
docker run -d \
  --name sl-job-runner \
  --network sl-network \
  --restart always \
  --env-file /sl/simplelogin.env \
  --add-host=host.docker.internal:host-gateway \
  -v /sl/dkim.key:/dkim.key:ro \
  -v /sl/dkim.pub.key:/dkim.pub.key:ro \
  -v /sl/upload:/code/static/upload \
  simplelogin/app:4.6.5-beta \
  python job_runner.py
Four containers. All running. But we're not done — Postfix is the piece that actually handles SMTP.
the Postfix config (and the TLS trap)
This is where I lost two hours. The setup itself is straightforward. The bug that follows is not.
Install Postfix
apt-get update && apt-get install -y postfix postfix-pgsql libsasl2-modulesChoose "Internet Site" when prompted. Set the system mail name to your domain.
Main Configuration
Replace /etc/postfix/main.cf with:
# Basic
smtpd_banner = $myhostname ESMTP
biff = no
append_dot_mydomain = no
readme_directory = no
compatibility_level = 3.6

# TLS - Outbound (Postfix → Brevo)
smtp_tls_security_level = encrypt
smtp_tls_note_starttls_offer = yes
smtp_tls_CAfile = /etc/ssl/certs/ca-certificates.crt
smtp_tls_loglevel = 1

# TLS - Inbound (Internet → Postfix)
smtpd_tls_cert_file = /etc/ssl/certs/ssl-cert-snakeoil.pem
smtpd_tls_key_file = /etc/ssl/private/ssl-cert-snakeoil.key
smtpd_tls_security_level = may

# Network
myhostname = sl.example.com
mydomain = sl.example.com
myorigin = $mydomain
mydestination = localhost
mynetworks = 127.0.0.0/8 [::ffff:127.0.0.0]/104 [::1]/128 172.16.0.0/12
inet_interfaces = all
inet_protocols = ipv4

# Relay through Brevo
relayhost = [smtp-relay.brevo.com]:587
smtp_sasl_auth_enable = yes
smtp_sasl_password_maps = hash:/etc/postfix/sasl_passwd
smtp_sasl_security_options = noanonymous

# Size limits
message_size_limit = 50000000
mailbox_size_limit = 0

# SimpleLogin integration
virtual_mailbox_domains = pgsql:/etc/postfix/pgsql-relay-domains.cf
virtual_mailbox_maps = pgsql:/etc/postfix/pgsql-transport-maps.cf
virtual_alias_maps = pgsql:/etc/postfix/pgsql-transport-maps.cf
transport_maps = pgsql:/etc/postfix/pgsql-transport-maps.cf
The TLS Trap
Here's what happened. Everything looked right. Containers running. Postfix installed. DNS verified. Sent a test email to my alias.
Nothing arrived.
Checked the Postfix logs:
journalctl -u postfix -n 50postfix/smtp[12345]: Untrusted TLS connection established to
smtp-relay.brevo.com[1.2.3.4]:587: TLSv1.3 with cipher
TLS_AES_256_GCM_SHA384 (256/256 bits)
postfix/smtp[12345]: certificate verification failed for
smtp-relay.brevo.com: unable to get local issuer certificateUntrusted TLS connection. Postfix was connecting to Brevo but refusing to send because it couldn't verify the certificate chain.
The fix? Two lines:
smtp_tls_security_level = encrypt
smtp_tls_CAfile = /etc/ssl/certs/ca-certificates.crt
The CAfile line tells Postfix where to find the system's CA certificates. Without it, Postfix has no root certificates to verify Brevo's TLS cert against. It connects, sees an "untrusted" cert, and drops the mail.
If you're on Ubuntu/Debian and the CA file is missing:
apt-get install -y ca-certificates
update-ca-certificates
Then restart Postfix:
systemctl restart postfixTwo hours. Two lines. Classic.
PostgreSQL Lookup Files
These let Postfix query SimpleLogin's database to know which domains and addresses to accept.
Create /etc/postfix/pgsql-relay-domains.cf:
hosts = localhost
user = sl_user
password = your_strong_password_here
dbname = simplelogin
query = SELECT domain FROM custom_domain WHERE domain='%s' AND verified=true
  UNION SELECT domain FROM public_domain WHERE domain='%s'
  UNION SELECT '%s' WHERE '%s' = 'sl.example.com' LIMIT 1;
Create /etc/postfix/pgsql-transport-maps.cf:
hosts = localhost
user = sl_user
password = your_strong_password_here
dbname = simplelogin
query = SELECT 'smtp:127.0.0.1:20381' FROM alias WHERE email='%s' AND enabled=true
  UNION SELECT 'smtp:127.0.0.1:20381' FROM custom_domain WHERE domain=split_part('%s', '@', 2) AND verified=true
  UNION SELECT 'smtp:127.0.0.1:20381' WHERE split_part('%s', '@', 2) = 'sl.example.com' LIMIT 1;
SASL Authentication for Brevo
Create /etc/postfix/sasl_passwd:
[smtp-relay.brevo.com]:587 your-brevo-login@example.com:your-brevo-smtp-keyLock it down and generate the hash:
chmod 600 /etc/postfix/sasl_passwd
postmap /etc/postfix/sasl_passwd
Expose PostgreSQL Port
Postfix runs on the host but needs to reach the Postgres container. Modify the sl-db container to expose the port:
docker stop sl-db
docker rm sl-db

docker run -d \
  --name sl-db \
  --network sl-network \
  --restart always \
  -e POSTGRES_DB=simplelogin \
  -e POSTGRES_USER=sl_user \
  -e POSTGRES_PASSWORD=your_strong_password_here \
  -v /sl/db:/var/lib/postgresql/data \
  -p 127.0.0.1:5432:5432 \
  postgres:16
Start Postfix
systemctl restart postfix
systemctl enable postfix
nginx reverse proxy
SimpleLogin's web UI runs on port 7777. Put Nginx in front for HTTPS.
server {
    server_name sl.example.com;

    location / {
        proxy_pass http://127.0.0.1:7777;
        proxy_set_header Host $host;
        proxy_set_header X-Real-IP $remote_addr;
        proxy_set_header X-Forwarded-For $proxy_add_x_forwarded_for;
        proxy_set_header X-Forwarded-Proto $scheme;
    }
}
Then get a real certificate:
apt-get install -y certbot python3-certbot-nginx
certbot --nginx -d sl.example.com
Certbot rewrites the Nginx config to add SSL and sets up auto-renewal. Done.
first login and lockdown
Go to https://sl.example.com and register your admin account using the email you set as ADMIN_EMAIL in the env file.
Now make yourself premium and lock the door:
# Enter the database
docker exec -it sl-db psql -U sl_user -d simplelogin

# Make your account premium (lifetime)
UPDATE users SET lifetime = true WHERE email = 'admin@sl.example.com';

# Disable registration so nobody else can sign up
\q
Add to your simplelogin.env:
DISABLE_REGISTRATION=1Restart the app container:
docker restart sl-app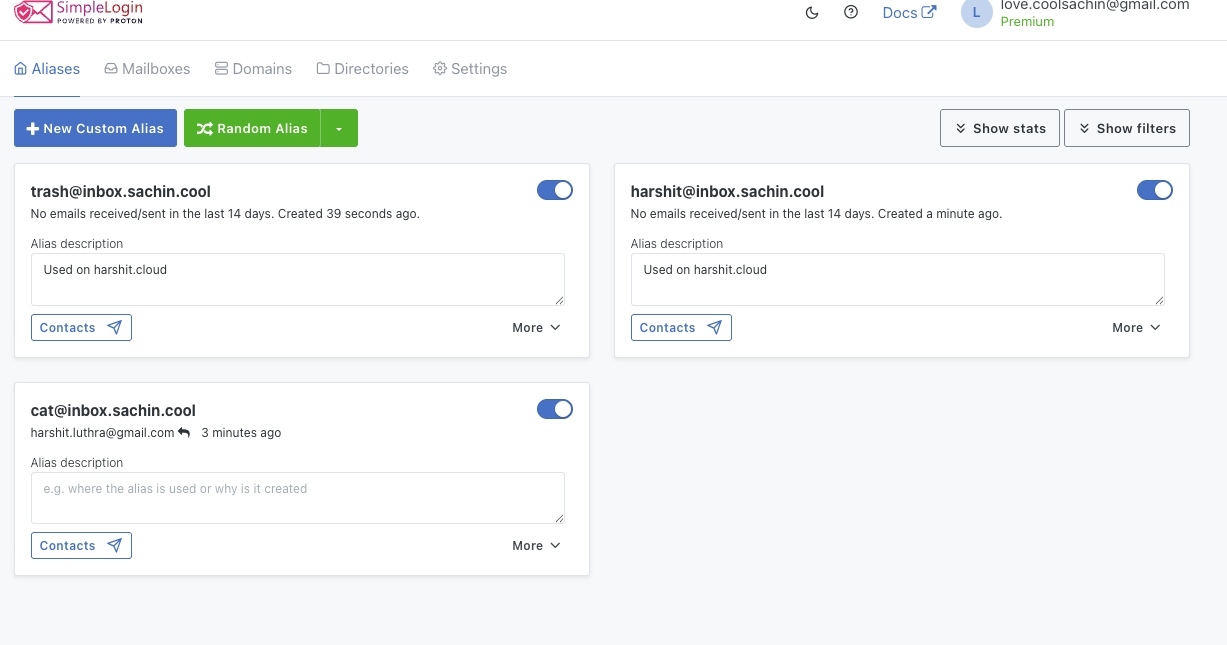
Your instance. Your aliases. Your data.
persistence across reboots
Make sure everything survives a server restart:
# Docker containers (already set with --restart always, but verify)
docker update --restart always sl-db sl-app sl-email sl-job-runner

# Postfix
systemctl enable postfix

# Nginx
systemctl enable nginx
Reboot and verify:
reboot

# After reboot
docker ps
systemctl status postfix
systemctl status nginx
lessons learned
Six things I wish I'd known before starting:
- Cloudflare proxy kills mail. The orange cloud proxies HTTP traffic through Cloudflare's network. SMTP on port 25 doesn't go through that proxy. Grey cloud (DNS only) or your MX records point nowhere useful.
- Brevo domain verification is fussy. Verify your sending domain in Brevo before configuring Postfix. If Brevo doesn't recognize your domain, outbound mail gets rejected at the relay, not at the destination. Hard to debug.
- The TLS CA certificate trap is real. Postfix doesn't use the system CA store by default. You must explicitly point it to
/etc/ssl/certs/ca-certificates.crt. Without this, outbound relay to Brevo fails silently with "untrusted TLS connection" in the logs.
- IP reputation matters more than you think. Fresh VPS IPs have zero reputation. Using Brevo as a relay piggybacks on their established reputation. Direct send from a new IP = spam folder.
- Pin your Postgres version. Use
postgres:16, notpostgres:latest. A major version bump (16 to 17) on a container restart will break your data directory without a manual migration.
- Use the app image, not app-ci. SimpleLogin publishes both
simplelogin/appandsimplelogin/app-ci. Theapp-ciimage is for their CI/CD pipeline. Usesimplelogin/appwith a specific version tag.
the proof
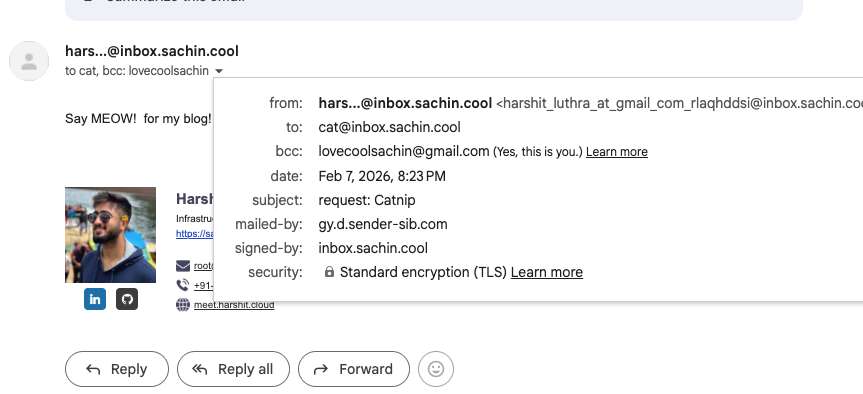
Here's what the full flow looks like in practice. Send a test email to your alias:
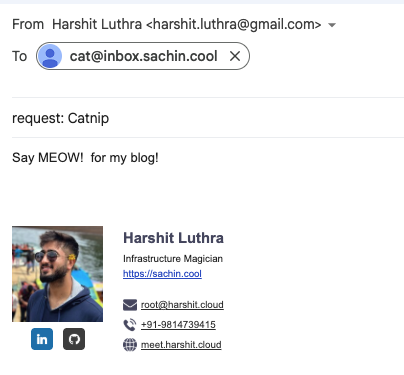
It arrives in your mailbox, forwarded through SimpleLogin. Check the headers — mailed by Brevo's relay, signed by your domain:
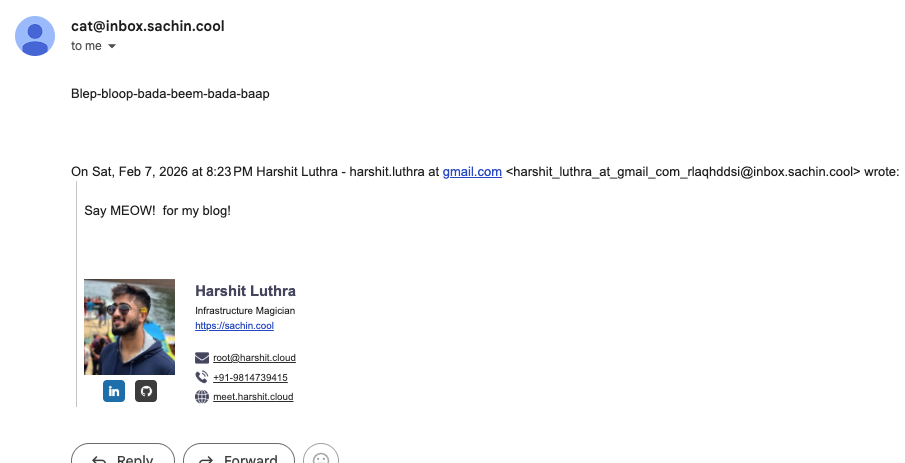
Now the real test. Hit reply. The recipient should see your alias, not your real email:
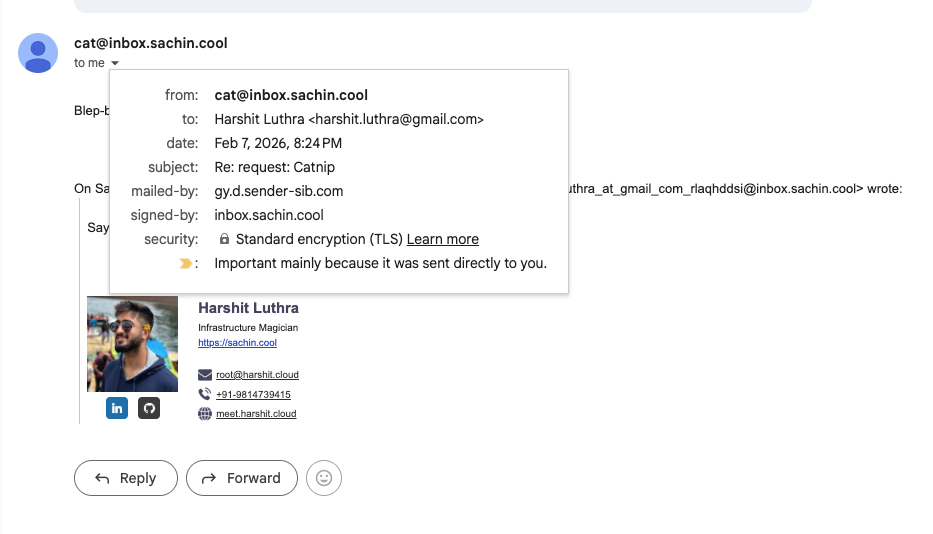
Check the headers on the reply. From: your alias. Signed-by: your domain. Your real address is nowhere in sight:
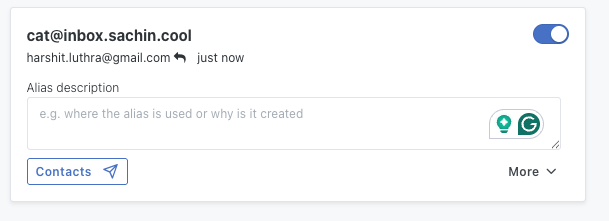
SimpleLogin's dashboard confirms the reply went through:
browser extension bonus
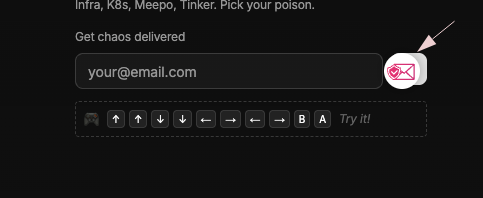
SimpleLogin also ships a browser extension. Visit any site, click the icon, and create an alias on the fly — no need to open the dashboard:
Between this and the Dokploy migration, my entire personal infrastructure runs on a single Hetzner box for under $5 a month. Email aliases, five websites, monitoring, backups. All mine. Two hours of setup, one of which was the TLS trap above.